
This chapter presents a sequential demonstration of the implementation of Timeout within a prototype network. It lists a set of criteria for a hypothetical domain and presents sequentially the process used to implement Timeout to protect and control the domain.
The hypothetical network used in the example consists of primarily two domains (subarea 12 and 13) within the single network NRS, a second network called FIRMB, and unidentified additional subareas, domains, and networks. The example presumes that you are installing Timeout into Subarea 12 (a simulated 3090) that has defined the systems programmer's devices starting with the letter "S" and printer type devices (3286s, etc.) have been defined with the letter "P".
|
|
|
|
For devices defined and owned by the local domain, a ACF/VTAM "front end" subsystem such as Network Director is used to force the terminal user to logon via the security system prior to gaining access to the domain. This front end is a CLSDST PASS type network manager and is the primary logical control point for userid and password validation.
The host domain is operating several ACF/VTAM subsystems, but specific situations require that special handling occur for TSO and CICS. Additionally, off hour and weekend access requires a tighter control on the weekends for the dial up devices.
As with any project, you should establish the requirements prior to implementation. One tool that can be used to help the planning of Timeout implementation is identified as Table 1.
The sample requirements for the hypothetical network can be expressed using this tabular format as follows:
| Administrative | Session Criteria | Disconnect | |||||||
| Name | Title | Dlu (Plu) | Olu (Slu) | Olu Netid | Olu Subarea | From | Connect Time | Inactivity | |
| Director | The Network Director | tnd | : | : | : | : | : | 0 | |
| Logappl | Director checked | : | : | : | : | tnd | : | 5m | |
| TSO | Time Sharing Option | tso* | : | : | : | : | : | 15m | |
| Hdqtrs | Corporate headquarters | : | : | firmb | 6 | : | : | 5m | |
| CICS | TP Systems | cics* | : | : | : | : | 8h | 10m | |
| Printers | Online printers | : | : | : | : | : | p* | 0 | |
| Systems | System programmers | : | s* | nrs | 12 | : | : | 0 | |
| Outside | Everything else | : | : | : | : | : | : | 1m | |
| Note: Empty locations in the worksheet indicate that the default value for the field is acceptable. For "Session Criteria" type fields, the default is the pattern matching character of an asterisk ("*"), which allows any value to match. | |||||||||
The 8 criteria expressed in the table are intended to control the generation of the Timeout rules and to set the desired session disconnect conditions.
This entry defines the ACF/VTAM front end processing subsystem (in this case, "Network Director"). Most devices in the domain are LOGAPPLed to this subsystem and outside devices (originating from other ACF/VTAM domains) may request the services of this subsystem.
As a result, the Director rule basically allows any type of session that includes a PLU of "TND" to proceed without a session disconnection by Timeout. It is our desire that Timeout leave devices in session with the controlling application "forever". This is because the controlling application has presented a request to sign on to the system to the user and disrupting this prompt would invalidate the security mechanism being used.
Once connected to the Director subsystem, the device operator will be required to sign on to the system via the security system (ACF2, RACF, TOPSECRET, etc.). The front end subsystem will then present a menu of authorized subsystems that are authorized for the terminal user. [This example assumes that the front end program is providing these services and has been configured to do so. Timeout itself does not verify that the front end has actually done this processing, but is simply enforcing the rules that are written. ] When the terminal operator selects one of the subsystems presented to the device, Timeout should recognize that the session being initiated is as a result of the ACF/VTAM controlling application and should have a 5 minute inactivity timer set.
The Logappl rule allows this because the "Director" APPL name is coded in the From field.
Even though the Logappl rule will allow the Director subsystem to forward ownership, there are devices in the network that are allowed to go into session with TSO even if the front end subsystem is not operational. The TSO rule indicates that any device not going via Network Director to TSO will have a 15 minute inactivity timer set.
The prior rules set timeout values for TSO or any subsystem reached via the VTAM front end. The HDQTRS rule allows any device from the NETID of FIRMB, Subarea 6 to have a 5 minute inactivity timer on any system except TSO (TSO will have a 15 minute timer as a function of the TSO rule being defined first).
The CICS rule sets a 10 minute inactivity timer for any devices that reaches any subsystem whose name starts with "CICS". Once a session is established, Timeout will also require that the session terminate within 8 hours of initiation (Connect time) or the session will be terminated.
It is important that you recognize that the session disconnect for this rule will occur if a device's session lasts more than 8 hours OR if the device is inactive or idle for more than 10 minutes.
During execution, many of the subsystems in the hypothetical domain utilize the services of 328x type printers connected throughout the network. You can identify them by their LU name (they all begin with a "P"). If your installation has no naming convention associated with printers, you should consider defining them as a Value Group and proceeding with rule definition.
The Printers rule disables the inactivity timer for all printer type devices.
Carefully note where this rule is in relation to the other Timeout rules. The location of our PRINTERS rule is such that printer sessions will be terminated if the printer enters a session with TSO (the TSO rule), from the FIRMB NETID (rule HDQTRS), or any CICS system (the CICS rule). In reality, if you would like to disable the inactivity timer for all printers in all subsystems, you must locate the PRINTERS rule ahead of the TSO, CICS, and HDQTRS rule.
This example has been provided to emphasize that the sequence of rule interpretation is critical to obtaining proper results.
This rule allows devices in our subarea and network that start with the letter "S" to have the inactivity timer disabled.
Again, this rule will only take effect if the TSO and CICS rules do not apply. SYSTEMS oriented devices will have 15 minute timers for TSO (the TSO rule) and 10 minute timers for CICS systems (the CICS rule). Rule sequence is critical to the proper implementation of your installation requirements.
The final rule is a "catch all rule" that will govern what should occur if a particular session does not have characteristics that match any of the preceding rules. The Outside rule will manage all other devices and sets a 1 minute inactivity timer.
You can simply leave this rule out and Timeout will disable the inactivity timer because no other rule has set it. However, by naming a specific catch all rule, the Message queue and SYSOUT will more clearly let you know what has occurred (even if you set the timeout interval to zero).
When Timeout is initially installed, the internal rule "GENERAL" will be in effect. GENERAL allows all sessions to proceed with no timeout interval in effect.
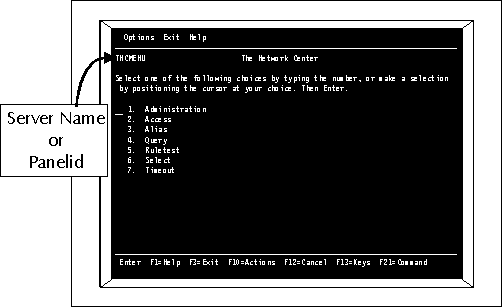
Timeout implementation of the scheme conceived in Table 2 begins with the replacement of the default GENERAL rule with the 8 rules we have identified. To accomplish this, you should logon to your tele-processing system and start The Network Center's interactive Network Center Interface. You will receive a LOGO panel (press Enter) and then the primary Network Center menu (called TNCMENU). It will look similar to:
|
|
|
Enter 7 and press Enter to select Timeout. [If the Administration or Timeout selection is blue or low intensity, you are not authorized to "Administer" The Network Center. Contact the Network Administrator. ]
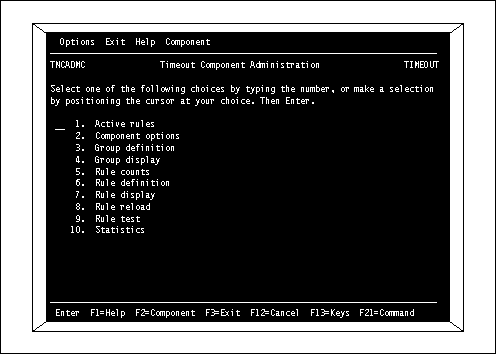
The next panel (TNCADMC) is the base location within The Network Center's panels for rule maintenance processes.
|
|
|
This is the panel that is the base for all Rule definition activity. Notice that the active logical Component name (Timeout) is displayed in the upper right of the panel. You will be returning to this panel several times during Rule processing.
You can now select item 6 (Rule definition) to begin entering the rules that were previously defined. You will receive the Rule definition panel TNCRULD. Enter the data fields from the worksheet into the appropriate data entry fields. Make sure you set the Mode field to "Active".

|
|
|
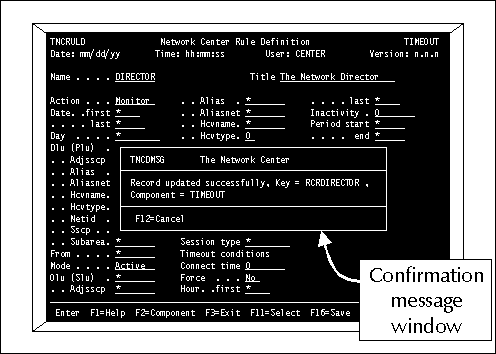
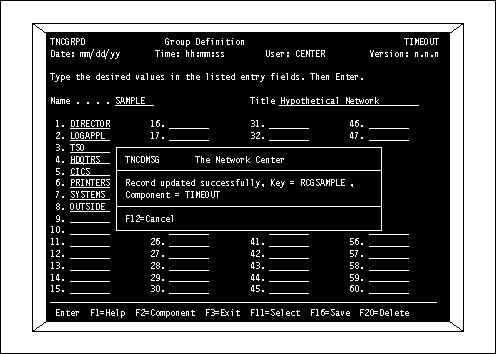
Once the data values have been entered, press Enter. The Network Center will apply some basic edits and refresh the panel with the data values that are set. If they are all correct, press F16 (Save) to store the rule in the Network Data File. The Network Center will respond with a confirmation message window.
|
|
|
Press F12 (Cancel) to eliminate the confirmation message and continue with the definition of the other rules. When all eight rules have been created, return to the Timeout Administration Panel by pressing F12 (Cancel).
|
|
|
|
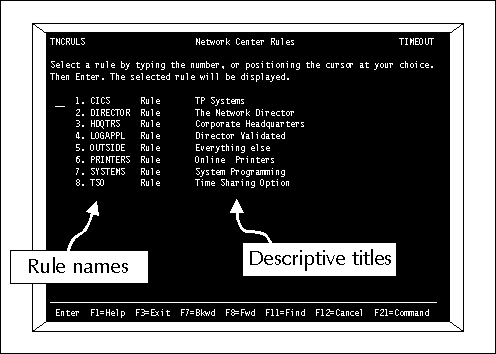
You can review the defined rules by selecting item 7 (Rule display).
The Network Center will respond with a selection list containing a single line for each defined record.
|
|
|
You can select each rule for display or update by simply moving the cursor to the appropriate line or entering the item number and pressing Enter. The rules in the display are listed in alphabetical order (not the order that they were entered in). The sequence of rules in this display does not control the sequence they are interpreted.
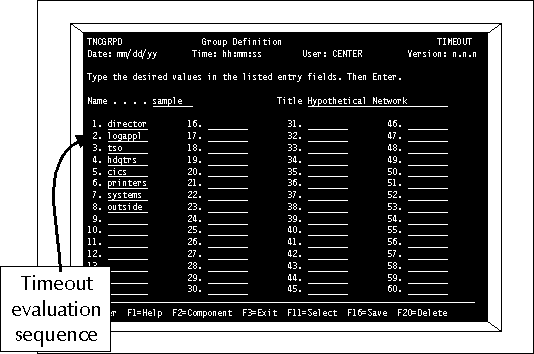
Now that each rule is established, you must describe to Timeout the sequence in which they should be compared to each session during ACF/VTAM session establishment. This is done via a Network Center Group definition panel reached from the Timeout Administration panel.
Enter the Timeout rules you would like to be utilized in the exact order you would like them interpreted. For our hypothetical network, the following values would be entered:
|
|
|
When the entries are in the sequence required by your implementation, press Enter. The Network Center will refresh the panel with your entered values in them.
If you are satisfied, press F16 (Save) to store the group definition in the Network Data File.
|
|
|
You have now created the eight rules required for the hypothetical network and the group definition that describes the sequence in which the rules should be processed.
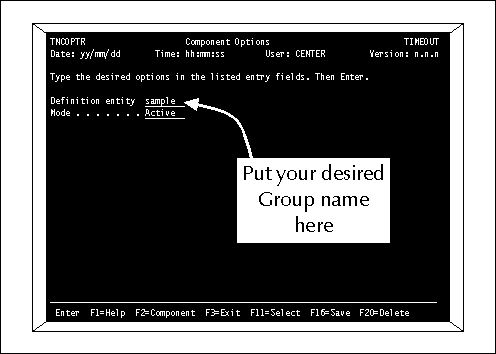
The last step in implementing the rules is to specify them as the active rules. This is done from item 2 (Component options) on the Timeout Component Administration panel.
|
|
|
Enter the name of the group that you would like to have active (our hypothetical network has used the name "SAMPLE") and press Enter. Press F16 (Save) when you are satisfied that the Options are set as desired.
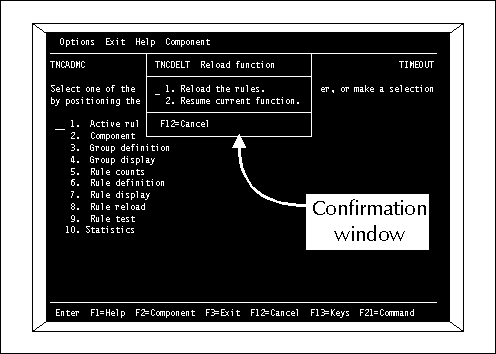
You have now generated a set of Timeout rules that will be active the next time Timeout is restarted (Network Center or Network Center Server restart). If you would like to activate the rules immediately, return to the Timeout Component Administration panel TNCADMC and select item 8 (Rule reload).
You will receive a confirmation window asking you to confirm that the rules should be reloaded.
|
|
|
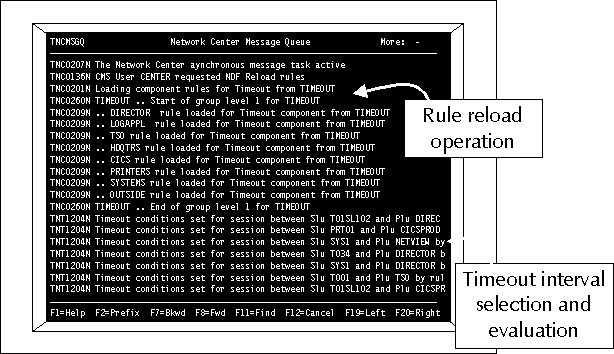
Press Enter to confirm the reload operation. The Timeout rules will now be loaded into storage by the Network Center Server and immediately be used by the Timeout Session Management Exit.
You can then verify that the Timeout rules you have activated are operational by reviewing the Message Queue (reached from the TNCADMN panel choice 5). Look for the TNT1204 messages being issued indicating that sessions are being evaluated by the proper rules:
|
|
|
Use the F2 (Prefix) action to activate the message numbers, etc. to validate the activities occurring within the Network Center Server.
Timeout terminations will be reflected to the end user in a variety of manners, dependent upon how the requested session was generated. Unformatted System Services users will simply be returned to USSMSG10, ACF/VTAM front end subsystem users will receive the next panel from the front end subsystem, etc.
The hypothetical network presented only a sample approach that might be taken. The flexibility of the rule process allows you to describe any type of relationship that may exist within your network.
You should actually proceed cautiously when originally implementing Timeout. You should take extra steps to insure that no sessions are improperly terminated while you are initially implementing Timeout.
To handle this, NRS recommends that you set the "OUTSIDE" rule (or its equivalent) in WARN MODE initially with OPTION=TRACE in effect. This will enable you to evaluate the conditions that exist at the time of a Timeout event and to determine the type of rule that should be written to handle the particular situation without actually interrupting any actual sessions.