Chapter 7. Query Menu Choices
This chapter contains information on each Query menu choice.
Menu choices are arranged alphabetically, as they appear as choices
on the main Query menu (TNQMENU), and are organized into sections,
as follows:
Application Program Blocks
Buffer Pool Directory
Buffer Pool Start Options
Configuration Table
Resource Definition Table
Session Information Blocks
Symbolic Resolution Table
System/User Logmode Table
Vector Table
Virtual Route Blocks
VTAM Start Options
Note: See Chapter 4. Selecting and Viewing Control Blocks for information on opening the
Query menu and selecting menu choices, and for techniques for
viewing and interpreting the control block displays.
When it is applicable, each section
contains the following subsections:
(Title): (The Name of the menu choice)
Definition: (The names of the control blocks you can
access with this choice; it may also contain control block
descriptions).
Access: (The keystrokes or commands that will get you to
the menu choice)
Tips: (advice for increasing your efficiency when using
this menu choice)
Warnings: (problems that might arise when you are using
this menu choice)
See also: (where to go for more information)
Definition:
"Application program blocks" lets you view the VTAM
control blocks that are associated with active applications. You can
display the following control blocks in either formatted or unformatted
modes:
- The VTAM Data Extent Block (ACDEB) is built when an
OPEN ACB is opened and represents an application program to VTAM.
It contains
information that VTAM needs in order to service application requests.
- The Logical Unit Control Block (LUCB) may represent an
active
application program or the SSCP. It is created when the program is
activated by OPEN ACB processing and is deleted by CLOSE ACB processing.
The LUCB anchors Function Management Control Block (FMCB) extensions,
which define the application programs active and pending sessions.
This is pointed to by the ACDLUCBA field of the ACDEB.
- The Process Scheduling Table (PST),
maintained for each application
program task, is the control point for scheduling asynchronous
functions related to an application program.
It is used to schedule I/O request processing, completion processing,
session-request completion, and asynchronous user exit routines.
It is pointed to by the ACDTSKID field of the ACDEB and
the LUCTSKID field of the LUCB.
- The Memory Process Schedule Table (MPST)
represents an application
program address space or virtual machine that has a PST and is a
control point for scheduling asynchronous functions related to
an application program. It is used to schedule I/O request
processing, completion processing, session-request completion, and
asynchronous user exit routines. It is pointed to by the
PSTMPSTP field of the PST.
- The Function Management Control Block (FMCB) is the
VTAM representation of a half-session.
It is associated with an application by the LUCB, which
points to a FMCB extension and hence to the FMCB.
It contains queue anchors for requests and responses, addresses
of processing routines established at session establishment,
the status of the half-session represented by the FMCB,
and queue headers for I/O requests represented by RPL's and TSCB's.
Access:
- Go to the Query Menu:
[See Opening the Query Menu for steps on accessing the Query menu.
]
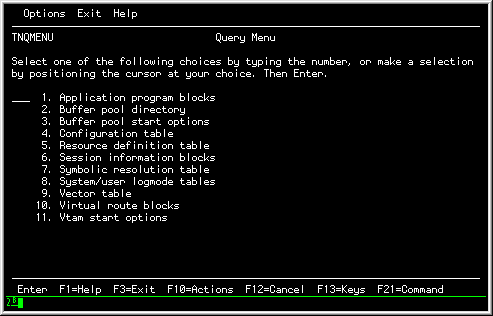 Query Menu (TNQMENU)
|
- Select choice 1, 'Application program blocks' from the Query Menu
(TNQMENU); a panel appears listing all VTAM data extent blocks for
your installation:
 Application Program Block Menu
|
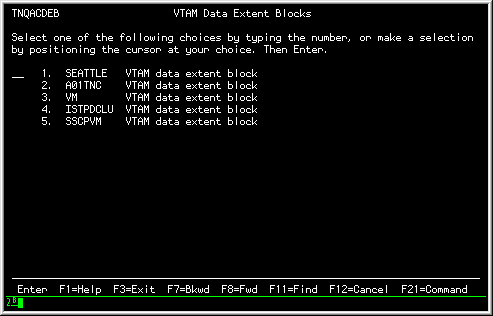
- Select from the menu to view additional menus and
block information. In the following example, we selected the VM
choice, which produced a list of FMCBs associated with the ACDEB:
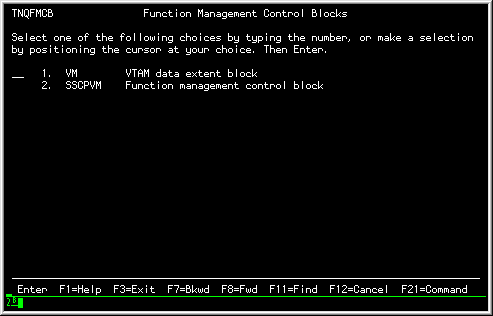 FMCB Menu panel
|
- You can then select a menu choice to view the associated
information.
In the following example, we selected choice 1, the VTAM data extent
block for VM:
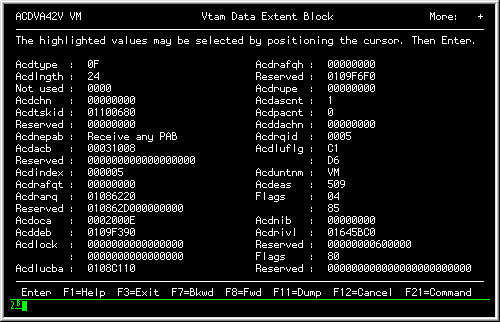 VTAM Data Extent Block
|
- After viewing the desired information, press F3 (Exit) to return to
the Query Menu, or use the F12 (Cancel) action to move back panel by
panel.
Tips:
To scroll through panels, use the F7 (Backward) and F8 (Forward)
actions.
To toggle between dump and format display, use the F11
(Dump/Format) action.
See also:
See Chapter 4. Selecting and Viewing Control Blocks for information on selecting and viewing
control blocks in Dump and Format mode, including restarting the
panel at a different location and using select fields.
See Chapter 5. Common Dialog Actions for information on actions that can
help you request, find, and format control blocks and related
information.
Definition:
"Buffer pool directory" allows you to display control blocks that
control or describe the VTAM buffer pools, including the Buffer Pool
Directory (BPDTY), Buffer Pool Entry (BPENT), and the Buffer Pool
Control Block (BPCB):
- The Buffer Pool Directory (BPDTY) is the main Storage Management
Services control block (SMS) and is built before the first useable
buffer pool is created. The directory anchors each Buffer Pool Control
Block (BPCB). It also contains SMS header information, an entry
(BPENT) for each pool, and the CBID table.
- The Buffer Pool Entry (BPENT) contains the attributes of a buffer
pool and the address of the Buffer Pool Control Block (BPCB)
corresponding to the buffer pool. There is one entry for each buffer
pool.
- The Buffer Pool Control Block (BPCB) is the SMS anchor block for a
buffer pool. It anchors a chain of free buffers, a queue of processors
waiting for buffers, and a queue of PXB's that represent expanded
portions of the buffer pool. There is one BPCB for each of the
fixed length buffer pools.
Access:
- Go to the Query Menu:
[See Opening the Query Menu for steps on accessing the Query menu.
]
|
Query Menu (TNQMENU)
|
- Select choice 2, 'Buffer pool directory';
a menu appears listing the available buffer pool
directory block (BPDTY) and buffer pool control blocks (BPCB):
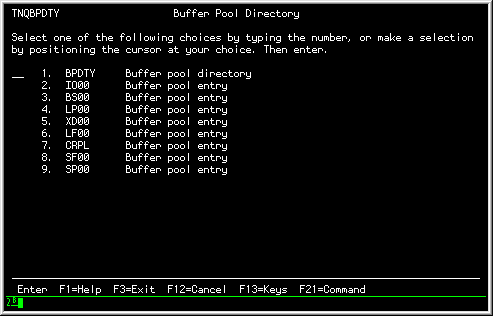 Buffer Pool Directory Menu
|
- You can then select the directory of a specific pool block for
display in hexadecimal or formatted mode. For example, in the
following example, we selected the 'BS00' Buffer pool entry, which
displayed the following Buffer pool control block in FORMAT mode:
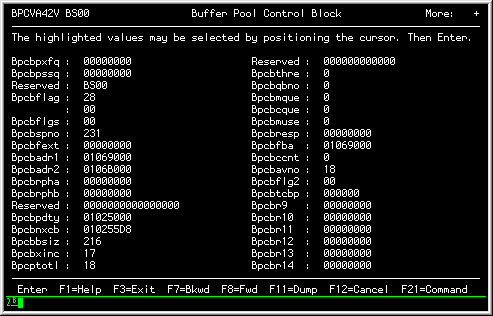 Buffer Pool Control Block
|
- After viewing the desired information, press F3 (Exit) to return to
the Query Menu, or use the F12 (Cancel) action to move back panel by
panel.
Tips:
To scroll through panels, use the F7 (Backward) and F8 (Forward)
actions.
To toggle between dump and format display, use the F11
(Dump/Format) action.
See also:
See Chapter 4. Selecting and Viewing Control Blocks for information on selecting and viewing
control blocks in Dump and Format mode, including restarting the
panel at a different location and using select fields.
See Chapter 5. Common Dialog Actions for information on actions that can
help you request, find, and format control blocks and related
information.
Definition:
"Buffer pool start options" creates a panel that contains the
individual buffer pool settings that were activated during VTAM
initialization. You can display the following information for
each buffer pool in formatted or dump mode:
- Poolid
- Identifies the buffer pool.
- Baseno
- Displays the starting value (base number) for the number of
buffers in the pool.
- Bufsize
- Displays the size in bytes of each buffer in the pool.
- Slowpt
- Defines a minimum threshold of buffers reserved for priority
requests. When the number of buffers in the pool is equal or less than
this value only priority requests are serviced; normal requests are
queued or rejected (i.e. slowdown).
- Xpanno
- Defines the number of buffers that VTAM will acquire when expanding
the buffer pool.
- Xpanpt
- The number that defines the expansion point for this buffer pool.
If the number of buffers falls below this point than the buffer pool is
expanded by the number of buffers defined in Xpanno.
- Xpanlim
- Defines the maximum allowed size for this buffer pool.
Access:
- Go to the Query Menu:
[See Opening the Query Menu for steps on accessing the Query menu.
]
|
Query Menu (TNQMENU)
|
- Select choice 3, 'Buffer pool start options';
the control block display appears. The following example shows FORMAT
mode:
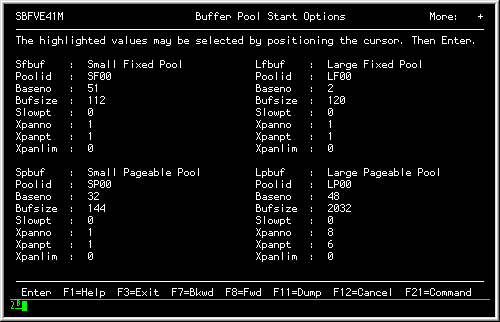 Buffer pool start options panel
|
- After viewing the panel information, you can use the F3 (Exit)
action to return to the Query Menu, or you can move back panel
by panel using the F12 (Cancel) action.
Tips:
To scroll through panels, use the F7 (Backward) and F8 (Forward)
actions.
To toggle between dump and format display, use the F11
(Dump/Format) action.
See also:
See Chapter 4. Selecting and Viewing Control Blocks for information on selecting and viewing
control blocks in Dump and Format mode, including restarting the
panel at a different location and using select fields.
See Chapter 5. Common Dialog Actions for information on actions that can
help you request, find, and format control blocks and related
information.
Definition:
"Configuration table" allows you to view the VTAM Configuration
Table (CONFT) in unformatted (DUMP) mode.
The CONFT is built during VTAM initialization (ACTCONnn VTAMLST member
or file) and contains information that describes the VTAM network.
Access:
- Go to the Query Menu:
[See Opening the Query Menu for steps on accessing the Query menu.
]
|
Query Menu (TNQMENU)
|
- Select choice 4, 'Configuration table'; the
CONFT appears in unformatted mode, as in the following example:
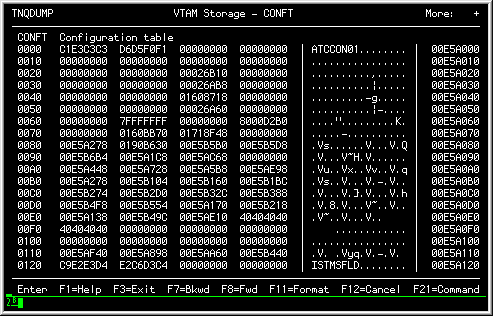 Configuration Table
|
If you select an address to restart the display with
and Query recognizes the control block you are pointing at, you can
display the control block in Format mode.
- After viewing the desired information, use the F3 (Exit) action to
return to the Query Menu, or use the F12 (Cancel) action to move
back panel by panel.
Tips:
To scroll through panels, use the F7 (Backward) and F8 (Forward)
actions.
To toggle between dump and format display, use the F11
(Dump/Format) action.
See also:
See Chapter 4. Selecting and Viewing Control Blocks for information on selecting and viewing
control blocks in Dump and Format mode, including restarting the
panel at a different location and using select fields.
See Chapter 5. Common Dialog Actions for information on actions that can
help you request, find, and format control blocks and related
information.
Definition:
"Resource definition table" allows you to display the entries in
the Resource Definition Table (RDT) that describe active resources in
the VTAM network (these are the current active definitions from
VTAMLST members of files).
You can display the following RDT entries or segment headers in
formatted or dump mode:
- Communication controller segment (RRN)
- Application program segment (RDTE)
- Local non-SNA segment (RDTE)
- Switched terminal segment (RSW)
- Local SNA terminal segment (RLS)
- Cross domain resource manager segment (RDTE)
- Cross domain resource segment (RDTE)
- Channel attached segment (RDTE)
- Cross domain resource manager entry (RCDRM)
- Group entry (RGP)
- Line entry (RLN)
- Direct attachment entry (RDA)
- Application program entry (RAP)
- Physical unit entry (RCC)
- Skeletal physical unit entry (RPX)
- Logical unit entry (RLU)
- Intermediate node entry (RIN)
- Cross domain resource entry (RCDRS)
- Skeletal logical unit entry (RLX)
Access:
- Go to the Query Menu:
[See Opening the Query Menu for steps on accessing the Query menu.
]
|
Query Menu (TNQMENU)
|
- Select choice 5, 'Resource definition table';
a list of Resource Definition Table Segments appears (these are the
major nodes within VTAM):
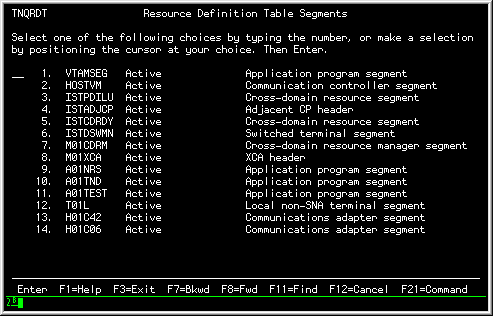 Resource Definition Table Segments menu
|
- You can then select a major node; Query will present a menu listing
the choices with the major node (in other words, the minor nodes). In
the following example we selected 'T01L':
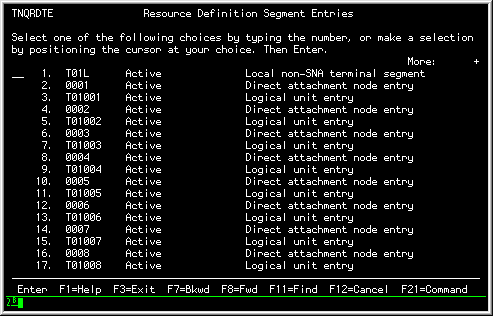 Resource Definition Segment Entries menu
|
- After receiving the menu list, you can select an item to view the
related information in hexadecimal or formatted mode.
In the following FORMAT mode example, we selected choice 2, '0001'
(the Direct attachment node entry):
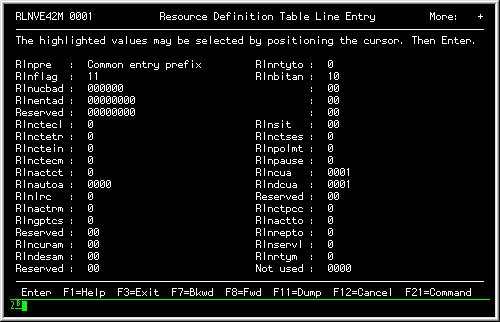 Resource Definition Table Line Entry
|
- After viewing the desired information, use the F3 (Exit) action to
return to the Query Menu, or use the F12 (Cancel) action to move
back panel by panel.
Tips:
To scroll through panels, use the F7 (Backward) and F8 (Forward)
actions.
To toggle between dump and format display, use the F11
(Dump/Format) action.
See also:
See Chapter 4. Selecting and Viewing Control Blocks for information on selecting and viewing
control blocks in Dump and Format mode, including restarting the
panel at a different location and using select fields.
See Chapter 5. Common Dialog Actions for information on actions that can
help you request, find, and format control blocks and related
information.
Definition:
"Session information block" lets you view an active session
between two logical units. The Session Information Block (SIB) is used
to track which sessions
exist and how far session establishment or termination has proceeded for
a particular session. There is one SIB for each session request received
by VTAM.
Each Resource Definition Table Entry (RDTE) has two SIB queues, one
for SIBs that represent sessions in which the LU is the primary session
end, and one for SIBs that represent sessions in which the LU is
the secondary session end. These queues include all active, pending
active, and queued sessions.
Each SIB is queued off to two RDTEs, one that represents the
primary session end, and one that represents the secondary session end.
The SIB in turn points at both of these RDTEs. Each SIB also contains
pointers to both a PLU and SLU resource extension.
Access:
- Go to the Query Menu:
[See Opening the Query Menu for steps on accessing the Query menu.
]
|
Query Menu (TNQMENU)
|
- Select choice 6, 'Session information blocks';
a menu appears listing each active session that exists
between two logical units, as in the following example:
 Session Information Blocks list
|
- Select the session information block (SIB) from the list that you
wish to view; the SIB panel appears in FORMAT or DUMP mode.
In the following example, we selected choice 6, 'T01001', which is in
FORMAT mode:
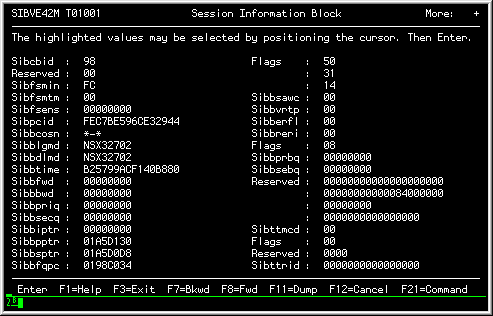 Session Information Block example
|
Use the F11 (Dump/Format) action to toggle between DUMP and
FORMAT mode panels.
- After viewing the desired information, use the F3 (Exit) action to
return to the Query Menu, or use the F12 (Cancel) action to move
back panel by panel.
Tips:
To scroll through panels, use the F7 (Backward) and F8 (Forward)
actions.
To toggle between dump and format display, use the F11
(Dump/Format) action.
See also:
See Chapter 4. Selecting and Viewing Control Blocks for information on selecting and viewing
control blocks in Dump and Format mode, including restarting the
panel at a different location and using select fields.
See Chapter 5. Common Dialog Actions for information on actions that can
help you request, find, and format control blocks and related
information.
See Determining a Session's BIND Image for an exteded example of using the Session
Information Block choice.
Definition:
"Symbolic resolution table" allows you to view the control block
for a defined VTAM resource or table.
Access:
- Go to the Query Menu:
[See Opening the Query Menu for steps on accessing the Query menu.
]
|
Query Menu (TNQMENU)
|
- Select choice 7, 'Symbolic resolution table';
the Symbolic Resolution Table Query panel appears:
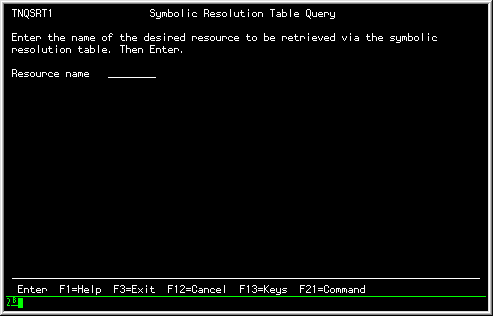 Symbolic Resolution Table Query prompt
|
- In the 'Resource name' field, enter the symbolic name for the
resource (RDT entry) that you would like to display; if Query can
locate the control block, it will display it.
For example, in the following figure, we entered the resource name
"t01001":
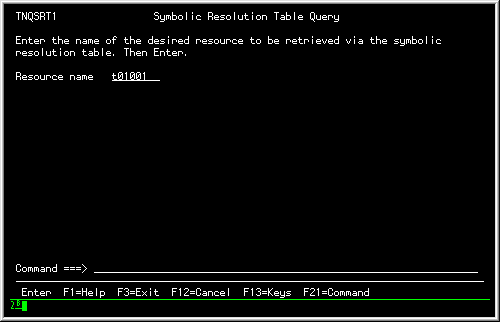 Example RDT entry
|
This produced a menu of RDTs that matched the entry:
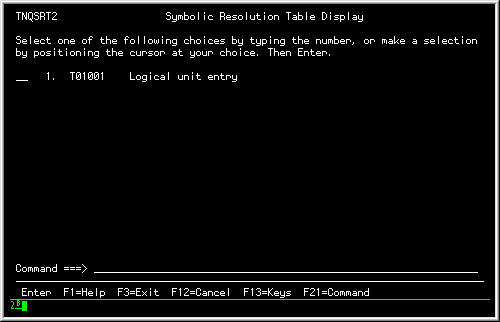 Symbolic Resolution Display Table
|
- If your Resource request provides any matches, you can select
from the menu to view the entries. In the following example, we selected
the RDT logical entry:
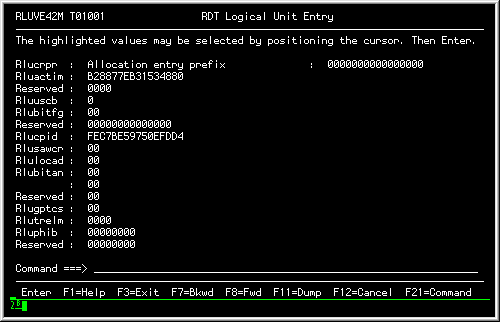 RDT Logical Unit Entry
|
- After viewing the desired information, use the F3 (Exit) action to
return to the Query Menu, or use the F12 (Cancel) action to move
back panel by panel.
Tips:
To scroll through panels, use the F7 (Backward) and F8 (Forward)
actions.
To toggle between dump and format display, use the F11
(Dump/Format) action.
See also:
See Chapter 4. Selecting and Viewing Control Blocks for information on selecting and viewing
control blocks in Dump and Format mode, including restarting the
panel at a different location and using select fields.
See Chapter 5. Common Dialog Actions for information on actions that can
help you request, find, and format control blocks and related
information.
Definition:
"System/user logmode table" lets you view the entries defined
within a VTAM system or user Logmode Table (LOGMD).
Each entry in this table describes the session parameters or
protocols (BIND image) for a particular type of device.
Access:
- Go to the Query Menu:
[See Opening the Query Menu for steps on accessing the Query menu.
]
|
Query Menu (TNQMENU)
|
- Select choice 8, 'System/user logmode table'; the Logmode Tables
panel appears:
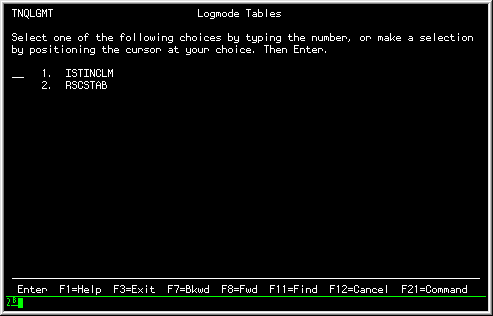 System Logmode Tables
|
- You can then select a LOGMODE table entry for viewing; a panel
appears listing each mode table entry for the table, as in the
following example:
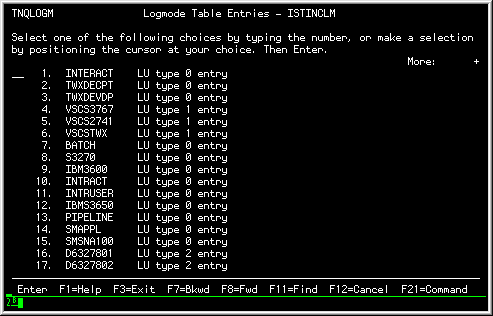 System Logmode Table Entries Menu
|
- You can then select an entry for further display in hexadecimal or
formatted mode. In the following example, we selected choice 7,
'Batch' (LU type 0 entry); it produced the following Bind Image:
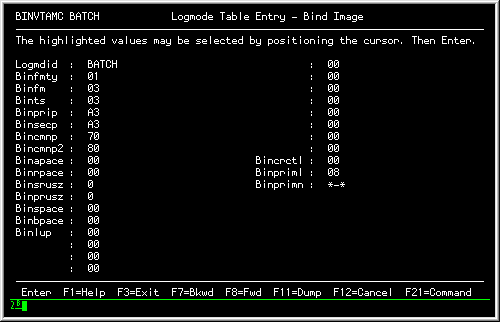 Logmode Table Entry - Bind Image
|
- After viewing the desired information, use the F3 (Exit) action to
return to the Query Menu, or use the F12 (Cancel) action to move
back panel by panel.
Tips:
To scroll through panels, use the F7 (Backward) and F8 (Forward)
actions.
To toggle between dump and format display, use the F11
(Dump/Format) action.
See also:
See Chapter 4. Selecting and Viewing Control Blocks for information on selecting and viewing
control blocks in Dump and Format mode, including restarting the
panel at a different location and using select fields.
See Chapter 5. Common Dialog Actions for information on actions that can
help you request, find, and format control blocks and related
information.
Definition:
"Vector table" lets you view the contents of the VTAM
Communications Vector Table (ATCVT) in unformatted (DUMP) mode.
The ATCVT is built during VTAM initialization and contains the
addresses of processing routines that are
not contained in DVTs. The ATCVT is the
principle data area in fixed storage that VTAM uses to find
the addresses of control blocks such as the RDT and SRT, which are
needed for VTAM processing.
It also contains some specific Process Anchor Blocks (PAB)
that define commonly used VTAM processes.
Access:
- Go to the Query Menu:
[See Opening the Query Menu for steps on accessing the Query menu.
]
|
Query Menu (TNQMENU)
|
- Select choice 9, 'Vector table'; a
hexadecimal panel appears of the ATCVT, as in the following example:
 ATCVT Information Panel
- After viewing the desired information, use the F3 (Exit) action to
return to the Query Menu, or use the F12 (Cancel) action to move
back panel by panel.
Tips:
To scroll through panels, use the F7 (Backward) and F8 (Forward)
actions.
The ATCVT can not be viewed in FORMAT mode.
(See Control blocks eligible for the FORMAT command for more information).
See also:
See Chapter 4. Selecting and Viewing Control Blocks for information on selecting and viewing
control blocks in Dump and Format mode, including restarting the
panel at a different location and using select fields.
See Chapter 5. Common Dialog Actions for information on actions that can
help you request, find, and format control blocks and related
information.
Definition:
"Virtual route blocks" lets you display the contents of the various
Virtual Route Blocks (VRBLK) known to VTAM.
The VRBLK describes a virtual route to a particular destination
subarea and contains three status areas, one for each transmission
priority.
Access:
- Go to the Query Menu:
[See Opening the Query Menu for steps on accessing the Query menu.
]
|
Query Menu (TNQMENU)
|
- Select choice 10, 'Virtual route blocks';
a menu appears listing the Virtual Routes to other destinations, as in
the following example:
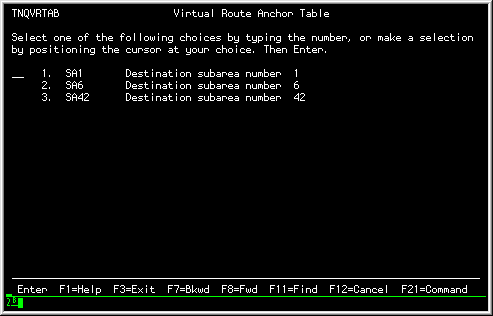 Virtual Route Anchor Table Menu
|
- You can then select one of the displayed routes for an additional
menu of the defined virtual routes. These, in turn, contain the
exact definitions and specific status of the virtual route.
For example, we selected choice 2, 'SA6' (Destination
subarea number 6), which produced a list of Virtual Route Blocks:
 Virtual Route Blocks list
|
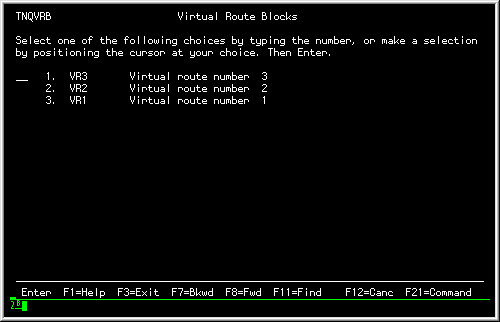
- You can then select from the list of available choices. For example,
we selected choice 3, 'VR1' (Virtual Route 1), which produced a
display of the Virtual Route Block:
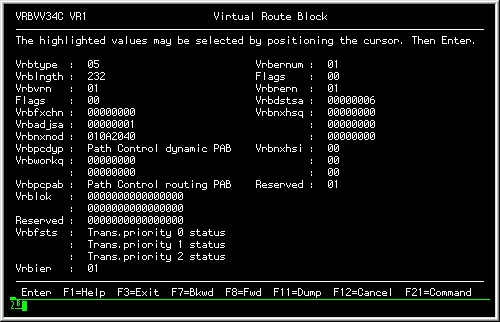 Virtual Route Block example
|
- After viewing the desired information, use the F3 (Exit) action to
return to the Query Menu, or use the F12 (Cancel) action to move
back panel by panel.
Tips:
To scroll through panels, use the F7 (Backward) and F8 (Forward)
actions.
To toggle between dump and format display, use the F11
(Dump/Format) action.
See also:
See Chapter 4. Selecting and Viewing Control Blocks for information on selecting and viewing
control blocks in Dump and Format mode, including restarting the
panel at a different location and using select fields.
See Chapter 5. Common Dialog Actions for information on actions that can
help you request, find, and format control blocks and related
information.
Definition:
"VTAM start options" lets you display the VTAM start options
as specified in the start procedures for VTAM at initialization.
It displays the following information in formatted mode:
- Version
- The release level of this VTAM
- Date
- The date that VTAM was started
- Time
- The time that VTAM was started
- Asyde
- The Asynchronous device end action
- Cdrscti
- The minimum retain time interval for dynamically defined
cross-domain resources
- Config
- The name of the configuration file (or member)
- Csalimit
- The maximum amount of CSA (or ECSA) to be used by VTAM
- Csa24
- The upper limit for VTAM explicitly requested 24-bit addressable
storage
- Dlrtcb
- The largest number of task control blocks (TCB) to be used by
dump-load-restart subtasks
- Gwsscp
- Identfies if there is SSCP gateway capability
- Hostpu
- The name of the VTAM host subarea PU in this host
- Hostpsa
- Defines a unique number for the host VTAM subarea
- Ioint
- The time interval for identifying outstanding responses for most RUs
- Itlim
- The maximum number of requests that VTAM can process simultaneously
- List
- Defines the list of predefined start options used to define a VTAM
domain
- Maxsuba
- Defines the highest subarea value that can be assigned to any node
within this network
- Msgmod
- Controls the insertion of module names into VTAM messages
- Netid
- The name of the network containing the host
- Nodelst
- The name of the file that maintains a list of the
currently active major nodes
- Ppolog
- Controls the information sent to the Primary Program Operator log
- Sonlim
- The maximum number of fixed I/O buffers for session outage
notification
- Sscpdyn
- Controls whether entries are dynamically added to the adjacent
SSCP table
- Sscpid
- The number used as part of the SSCP identifier
- Sscpname
- The name of the VTAM SSCP
- Sscpord
- Controls the search order of the adjacent SSCP table
- Supp
- Controls the suppression of different classes of VTAM messages
- Tunstat
- Controls the collection and display of tuning statistics
- Usstab
- The name of the USS table
VTAM start options
|
Access:
- Go to the Query Menu:
[See Opening the Query Menu for steps on accessing the Query menu.
]
|
Query Menu (TNQMENU)
|
- Select choice 11, 'VTAM start options'; the Vtam Start Options
panel appears, as in the following example:
 VTAM Start Options Information Panel
|
- After viewing the desired information, use the F3 (Exit) action to
return to the Query Menu, or use the F12 (Cancel) action to move
back panel by panel.
Tips:
To scroll through panels, use the F7 (Backward) and F8 (Forward)
actions.
To toggle between dump and format display, use the F11
(Dump/Format) action.
See also:
See Chapter 4. Selecting and Viewing Control Blocks for information on selecting and viewing
control blocks in Dump and Format mode, including restarting the
panel at a different location and using select fields.
See Chapter 5. Common Dialog Actions for information on actions that can
help you request, find, and format control blocks and related
information.
Copyright © 2000 North Ridge Software, Inc.